This article is a guide that explains how to use Auto-Tune written by an experienced sound engineer. I will answer the question: how does autotune work? I’ll explain for what purposes and how to use Antares Auto-Tune, and explain our favorite tricks for working with this application. I’ll also give you some presets that in my experience have fit perfectly for mixing songs of different genres.
What is Auto-Tune? Auto-Tune is an instrument created by Antares Audio Technologies that is widely used in modern music. Its latest version is Auto-Tune Pro. The initial purpose of the program was pitch correction, now it’s very popular also for its unique effect on the vocal that is used in creating rap, pop, hip-hop, and other genre songs.
How to use Auto-Tune? Auto-Tune can be used live during the recording process and also in post-recording for editing vocals and pitch correction. It can be used as a VST plugin for different DAW, such as Pro Tools, Logic Pro, Ableton, Cubase, and others.
This software can be a powerful instrument for a sound engineer, however, only when you understand all its options and settings, you will know how to use Auto-Tune to its full potential.
What is Auto-Tune and how does it work?
Auto-Tune allows you to shift the pitch of the vocal to match the needed key automatically. If you know how to use Auto-Tune and apply it correctly, you’ll receive the same voice but singing the right notes. By changing some parameters, you also can maximize the famous Auto-Tune sound effect on the voice.
Main ways of using Auto-Tune:
- Real-time pitch correction. It can be used during recording sessions or live performances to change the pitch of the voice in real-time. Auto-Tune automatically shifts the pitch of the voice to the nearest key belonging to the specified harmony. This way you can correct the imperfection of the singing instantly and make the artist sound perfectly in harmony with the music.
- Applying Auto-Tune to the recorded audio. The plug-in can also be used after the recording process is done to correct the vocal. To do it, you have to separate a vocal track you want to autotune and apply the plug-in to it with the needed settings.
- Manual pitch correction. An option for manual voice correction is also present in Auto-Tune Pro. If you know how to use Auto-Tune in graph mode, You can apply manual corrections as you would do using Melodyne studio. This option is needed when you want to gently correct certain parts of the recorded sound wave.
- Creating the Auto-Tune effect. Some artists, though, use Auto-Tune only for the reason of receiving the Auto-Tune effect on their voice. With the effect on maximum, the voice becomes similar to computer-generated sound at the same time still sounding quite human. It also jumps roughly from note to note without the gentle transitions a natural singing would create. These qualities of sound have become quite popular and for some artists, Auto-Tune effect became the feature of their music, the core part of their unique sound by which the audience recognizes them.
How to use AutoTune?
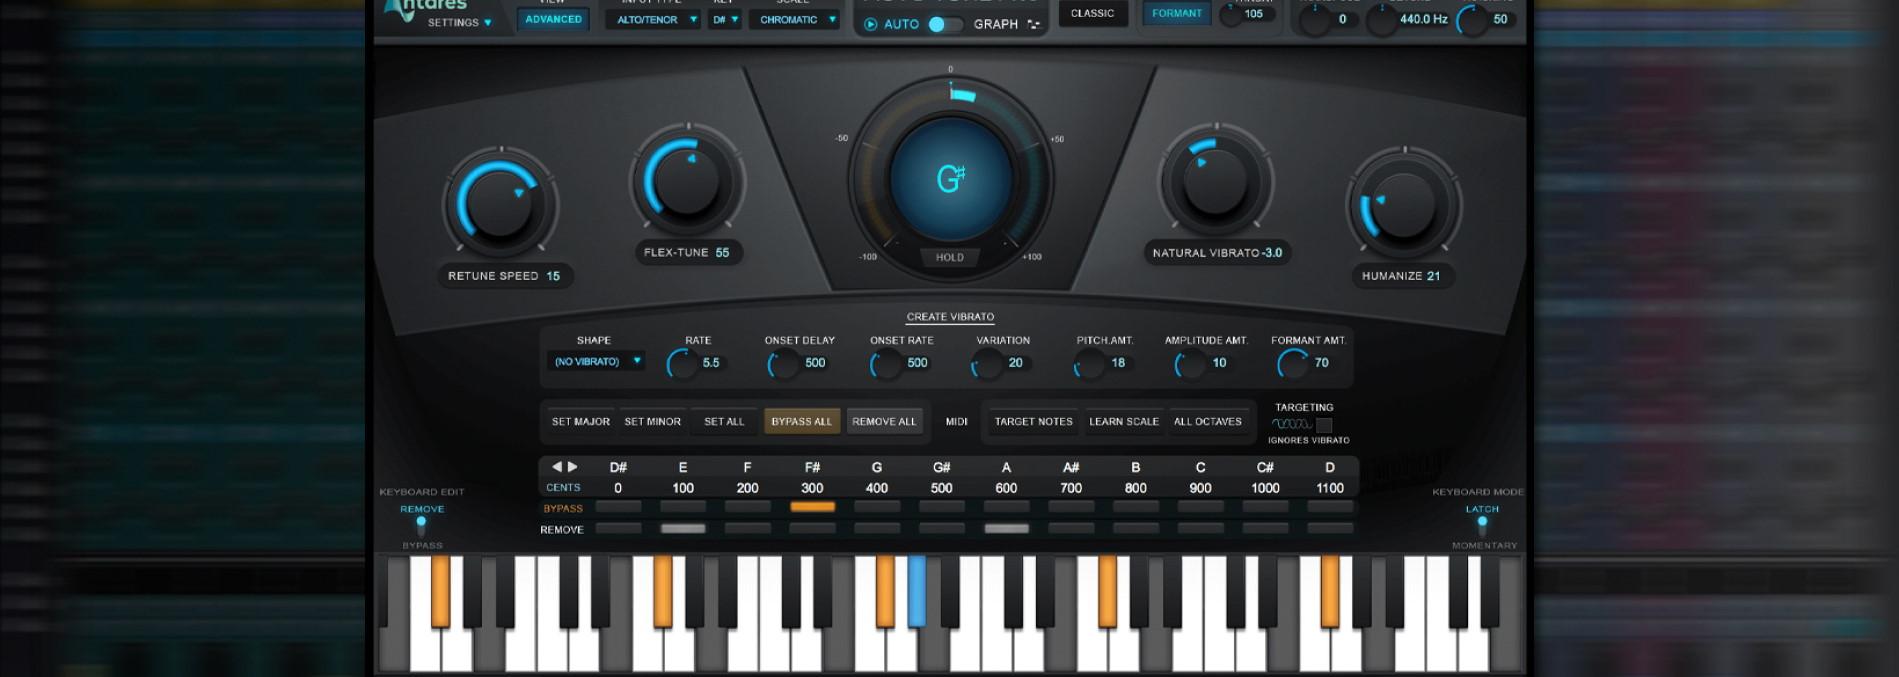
Let’s say I am going to apply Auto-Tune right now, what settings will I choose? In what order? How to use Auto-Tune? Let’s go through the settings one by one. First, there are General autotune settings that are shown with a basic view option.
1. Choose Input type

First, I set Input type. Remember how to use Auto-Tune correctly and apply it only to a voice or instrument that produces one pitch at a time, the algorithm won’t work on a polyphony. For input type, we have a choice of Soprano, Alto/Tenor, Low Male, Instrument, and Bass Instrument. If it’s an unnaturally high male voice or high female voice we’ll choose soprano. For a medium male or female voice, we choose Alto/Tenor, and so on. We also can use Auto-Tune with instruments, but they should play one note at a time.
2. Find your Key and Scale

Then we need to choose the key of the song, it will help the plugin to tune the vocal only to certain keys that belong to this song’s harmony. This will minimize the mistakes.
To choose the Key and the scale, you can use an additional plugin Auto-Key that goes with Auto-Tune Pro. Auto-Key can detect the Key of the song using a vocal or accompaniment track. It will not always choose correctly, but if you cannot determine the key of the song yourself, Auto-Key is your best shot.
Another way is to use the chromatic scale option. In this case, all the notes will be included and you will be able to later delete the notes you don’t need to use. We recommend you to use Chromatic mode and then choose scale using advanced mode. We will describe it later in this article.
3. Choose between Auto and Graph mode

Besides the Auto mode for autotuning, Auto-Tune Pro contains a Graph mode for manual sound correction. This Melodyne-like feature is complicated and powerful, you can correct particular places in the recording the way you like manually. However, how to use Auto-Tune for manual voice corrections is the topic for a separate article, so here we’ll be talking about the Auto mode in Auto-Tune.
4. Play with Formant and Throat

Formant and throat are the options that were absent in old versions of Auto-Tune, and their presence makes it possible to shift the voice to a more distant pitch or transpose the track to a large interval without receiving a chipmunk or other unnatural effects. These options allow adjusting the virtual throat so that it would correspond to the resulting pitch produced by a human. Of course, on the other hand, you can use these options to create an unnatural low or high timbre effect. But in most cases, we don’t use this setting.
5. Don’t change Transpose

Usually, you don’t need to change this setting. It’s always better to make another vocal recording in a different key if you need one. However, this option exists, and it helps you transpose your entire track higher or lower. Just select the number of semitones corresponding to the transposition interval and the pitch will be shifted in real-time. This also shows how to use Auto-Tune for creating a polyphony of vocals or changing the key of vocals in your song.
6. Use Detune if you have a different reference pitch

How to use Auto-Tune for songs tuned to another reference key frequency? For this, you can set the reference pitch in the Detune option. In the whole musical world today the reference pitch is 440Hz for the A key. The instruments are usually tuned according to this standard. It’s quite probable that you’ll never need to change this parameter.
However, if you come across a song that was recorded with a different reference A, or if you wish to create a song with different reference middle A frequency, you can easily detune the application setting to the old 432Hz reference or other.
7. Set up your Tracking

Tracking represents the Auto-Tune sensitivity. Initially, it’s set for 50 and you probably won’t need to change that. However, if you have a clean studio recording, you may set the value higher, or if there’s a lot of background noise, you might need to reduce the value a little.
8. Choose Retune speed for your recording

This is one of the main control options in Auto-Tune, it lets you choose how quickly the application will correct the pitch.
And this is how to use Auto-Tune for creating a robotic voice. When set to 0, it produces the famous “Cher effect” or “T-Pain effect” on the vocal. This effect was first made famous by Cher’s song “Believe”. The corrected vocal switches pitch abruptly, and we hear a robotic sound jumping from one note to another quickly.
On the other hand, when the retune speed is slowed down (higher values), it makes more gentle corrections with less robotic effect. It’s great if the target is just a slight pitch correction and you don’t mind having a bit of the initial singer’s pitch get into the song.
9. Adjust Flex Tune

When Flex Tune is set to zero, it allows the application to tune every moment of the vocal sound wave to the nearest correct pitch.
When we set it to a value greater than zero, it only corrects the sound which is in a certain proximity to the correct pitch. The greater the value, the closer to the correct pitch the vocal should be to be corrected, the voice variations that are farther from the note than the set value, will not be corrected.
So in practice, what this parameter does, it allows leaving the singer’s voice variations in approaching the note in the song unchanged. We also can’t do without Flex Tune when we autotune a guitar track, because there are lots of sounds sliding up and down the pitch in a guitar part, and we want to preserve that.
9. Set up Natural Vibrato knob

This parameter is initially set to zero. If we move it in the positive direction, it will amplify the vibrations in the vocal, if we move it in the negative direction, it will smoothen the vocal.
10. Use Humanize

This setting helps you to reduce the robotic effect of Auto-Tune even more. It is useful when you are using small Retune Speed values, then Humanize will decrease the retune speed for longer sounds making them more natural, and leave quick retune speed for short sounds.
11. Use Create vibrato for special effects

This is a whole bunch of parameters for creating vibration in your voice that wasn’t present there. If you’d like to hear how this function is used in production projects, you can hear some of it in Post Malone’s songs.
The parameters in the “create vibrato” group specify it even more, where “shape” lets us choose the type of vibrato, “rate” specifies its speed, “onset delay” shows the time in milliseconds from the beginning of the note to the vibrato, “onset rate” shows the timespan in milliseconds from starting the vibrato to its highest point, “variation” is a random diversity in the vibrato that humanizes it. “Pitch amount”, “Amplitude amount” and “Format amount” specify the vibrato even further.
12. Choose your scale at The Edit Scale Display in Advanced mode
As we said earlier, you can manipulate the scale parameters by choosing the chromatic scale option at the top of the app’s window plus pressing the advanced mode. In this case, you’ll see an active keyboard that will visualize your scale choice. The notes in the vocal will be also shown on the keyboard while playing the song.
At the same time, there are also options in the advanced screen to choose a major or minor scale. Most importantly, here we can work with each key separately using “Bypass” and “Remove” functions.

Bypass and Remove. If you press “Bypass” for a note, the pitch that would have been tuned to match this note will be left unedited. Activating “Remove” for a note will delete this note from your scale, so the pitch will be tuned to the next closest note.
You can use these two switches to create your own scale and note selection for autotuning in various ways.
Applying “Bypass” and “Remove” can be useful, for example, in the following cases:
• A few off-tune notes. Maybe you don’t need to correct every sound in the song, just a couple of off-tune notes. In this case, you can bypass the whole chromatic scale except for these two notes that need correction.
• Removing an extra note from scale. In another case, you may remove a note because you’d like AutoTune to tune the voice to another note and this one is just standing in the way.
• Building a custom scale. You want to create a scale with just a few notes that are far apart to get a more expressive Auto-Tune effect
• Add an extra note to the scale. Maybe the vocal must sing a note that is absent in the song’s main scale. Then you can deactivate the “remove” button for this note, and this way you are adding the note to the scale, and it will be used in the autotuning.
There are other cases. For example, if you are not professional and not sure what the song’s scale is, be not afraid to use these advanced options, experiment with the switches, adding the notes that you need, and removing extra notes.
Use a keyboard edit switch remove/bypass to the left of the keyboard to remove or bypass certain notes using the virtual keyboard
Want a free test mix of your track?
We get it.
That’s why we’ll do a full hybrid (analog + digital) mix of your song —
for free.
No upfront payment. No risk.
You only pay if you’re blown away. And if you are, we’ll slash 40% off the final price.
Nobody else in mixing and mastering offers this.
Why?
Because most studios say yes to every project. We don’t. We only mix what we’re excited about — so send us your best track. If we like it, we’ll mix it like it’s going to the Grammys.
👉 Just drop your name and email to get started.
How to use Auto-Tune: TIPS
Auto-Tune is a complicated algorithm, and its effect may differ depending on the individual vocal qualities and singing style.
Tip #1
If you are planning to use Auto-Tune for your song, especially its robotic effects, the main rule is to listen to it during the recording.
The singer chooses how to use Auto-Tune depending on the characteristics of the computer that is used and personal preferences. The singer can listen to the autotuned sound live in their headphones or right after the recording process. Checking the result is crucial especially for receiving a heavy Auto-Tune effect because you can not predict how the autotuned track will look like. There may appear unwanted effects or sounds, and the singer will need to redo the recording in such a way that will produce the desired sound with Auto-Tune applied.
As Auto-Tune corrects you, in case you can not hear what note you are singing, you may wander farther off-tune as the song goes on. That’s why, when you are singing and listening to the autotuned version of the sound simultaneously in your headphones, it might be useful to leave one headphone off your ear so you could hear the natural pitch of your voice as well.
Tip #2
When choosing the scale in the beginning, choose the chromatic scale at the top of the window, and the advanced view mode.
When you choose “chromatic” for scale at the top and advanced view mode, the keyboard at the bottom of the window gets activated. And you will be able to enjoy all the benefits of the Edit Scale Display we described earlier in this article. You’ll have the option of choosing a major or minor scale again, and the opportunity to “bypass” or “remove” for every note.
Every voice and singing style is different, so it takes some time at first to learn how to use Auto-Tune, and what settings should be applied for different songs. With experience, you’ll have more insight, but still, for every song, you’ll have to experiment a little and play with the settings listening to different variants of corrected audio until you choose the final version.
Here, I’ll give you my presets, and you’ll see how to use Auto-Tune for different genres. The key and the scale you’ll have to set depending on the song.
Auto-Tune – My Presets
T-Pain Auto-Tune preset (Heavy robotic effect)
Retune Speed – 0
Flex tune – 0
Natural Vibrato – 0
Humanize – 0
Formant/Throat – +1
Hip-Hop Auto-Tune preset
Retune Speed – 30
Flex tune – 0
Natural Vibrato – 0
Humanize – 100
Formant/Throat – 100
Pop Auto-Tune preset
Retune Speed – 20-40
Flex tune – 10
Natural Vibrato – 0
Humanize – 30
Formant/Throat – 100
Gentle Auto-Tune preset for subtle pitch correction
Retune Speed – 30-40
Flex tune – 20
Natural Vibrato – 0
Humanize – 45
Formant/Throat – 99
How Auto-Tune affected the music industry?
Auto-Tune was introduced by Antares Audio Technologies in the 1990s. Since then, it was slowly gaining popularity, and musicians learned how to use Auto-Tune for different genres. The turning point to the success was in the late 2000s when it started to become the crucial part of rap and hip-hop sound. T-Pain advertised it to the whole world when he made the Auto-Tune effect the main feature in his songs. Now Auto-Tune is used in the production of almost every song.
There’s no doubt that autotune music changed the music industry. It allowed new artists to rise to the top of the charts, introduced new creative ideas into the songwriting, helped many genres to develop further, like Rap, Hip-Hop, and even Pop music.
Auto-Tune reinforced more progress in the music industry and it’s here to stay whether we like it or not. So, learn more about how to use Auto-Tune for your style so you can modify and enhance your sound.
See also – How to Mix a Vocal?
See also – Mixing Tips
See also – Music Production Services
Pitch correction by Major Mixing
Here at Major Mixing, we work with Auto-Tune all the time. We use it while mixing and mastering almost every song. If you are not a professional, don’t mix and master your songs yourself. An experienced sound engineer can mix and master your song in such a way that it would sound according to the top-chart standards. In the end, it’s all about the sound, how it catches the audience, how it involves the listener, how it is spacious and powerful. We know how to create such qualities because we spent 10+ years working on big music industry projects.
Applying Auto-Tune to the song is included in our mix and master services with no additional charge.
We also know how to use Auto-Tune in the graph mode, Melodyne, and other applications professionally to apply a gentle pitch correct of the vocal track and tune it naturally, without any extra effects.
Vocal Correction is available at Major Mixing as an add-on when you order mixing, or you can order it separately.
Trust professionals with your song, and move with the masters!

 This article is a guide that explains how to use Auto-Tune written by an experienced sound engineer. I will answer the question: how does autotune work? I’ll explain for what purposes and how to use Antares Auto-Tune, and explain our favorite tricks for working with this application. I’ll also give you some presets that in my experience have fit perfectly for


