
A good solid drum sound forms the basis of a song. Of course, it depends on the genre but most of the time it’s true, and a mixing engineer should know how to compress and equalize drums to reach the desired qualities.
Without consistent and impressive drums, your mix will sound weak.
How do you mix drums to make them fat and impressive? Most of the time, parallel compression is the answer.
What is parallel compression?
Parallel processing is the type of audio processing where a wet (processed) signal is mixed with the initial dry signal (not processed).
Parallel compression is a powerful tool that gives power and volume to a recording without harming its dynamic range.
For parallel compression, one channel or a group of channels can be duplicated in order to compress the copy and then mix it with the initial dry signal.
Let’s now explain the process more deeply.
How a compressed signal is different from parallel compression
Parallel compression is a smart decision because it unites the advantages of both worlds: compressed and natural recordings.
The advantages of a dry signal:
- Great dynamic range
- Transients that cut through the mix
- Natural sound
The advantages of a compressed signal:
- High perceived volume
- Increased sustain
- Quiet parts become louder
- Fatter and more powerful sound
For parallel compression, you unite the dry and wet sounds and enjoy all the advantages of both compressed and uncompressed recordings.
The dry drum sound waveform may look like the one in the following picture. You can see that the transients are great, but the body of the sound is not heavy.
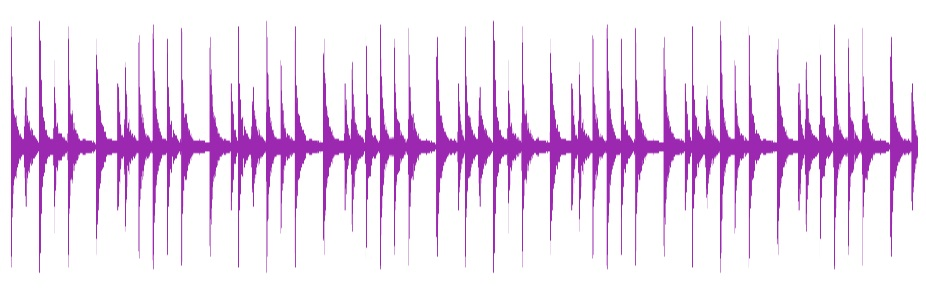
With parallel compression you keep the original transients of the instrument you get from the initial track, but the processed signal brings in the enhanced sustain and more volume and body to the audio track.
Therefore, this type of compression may give you a waveform like the one in the picture.

Of course, it’s just an example, and your waveform may look different. But generally, as a result of applying parallel compression, the music seems wider, creating the illusion of a bigger room. The sound becomes fatter, and perceived loudness grows. But at the same time, the dynamics is still good and the transients are as big as they were.
Want a free test mix of your track?
We get it.
That’s why we’ll do a full hybrid (analog + digital) mix of your song —
for free.
No upfront payment. No risk.
You only pay if you’re blown away. And if you are, we’ll slash 40% off the final price.
Nobody else in mixing and mastering offers this.
Why?
Because most studios say yes to every project. We don’t. We only mix what we’re excited about — so send us your best track. If we like it, we’ll mix it like it’s going to the Grammys.
👉 Just drop your name and email to get started.
How to set up parallel compression?
There are several ways to set up parallel compression. You can create it using send and return or duplicating the tracks. And another option is to create parallel compression inside the compression plugin.
Using send for parallel compressing
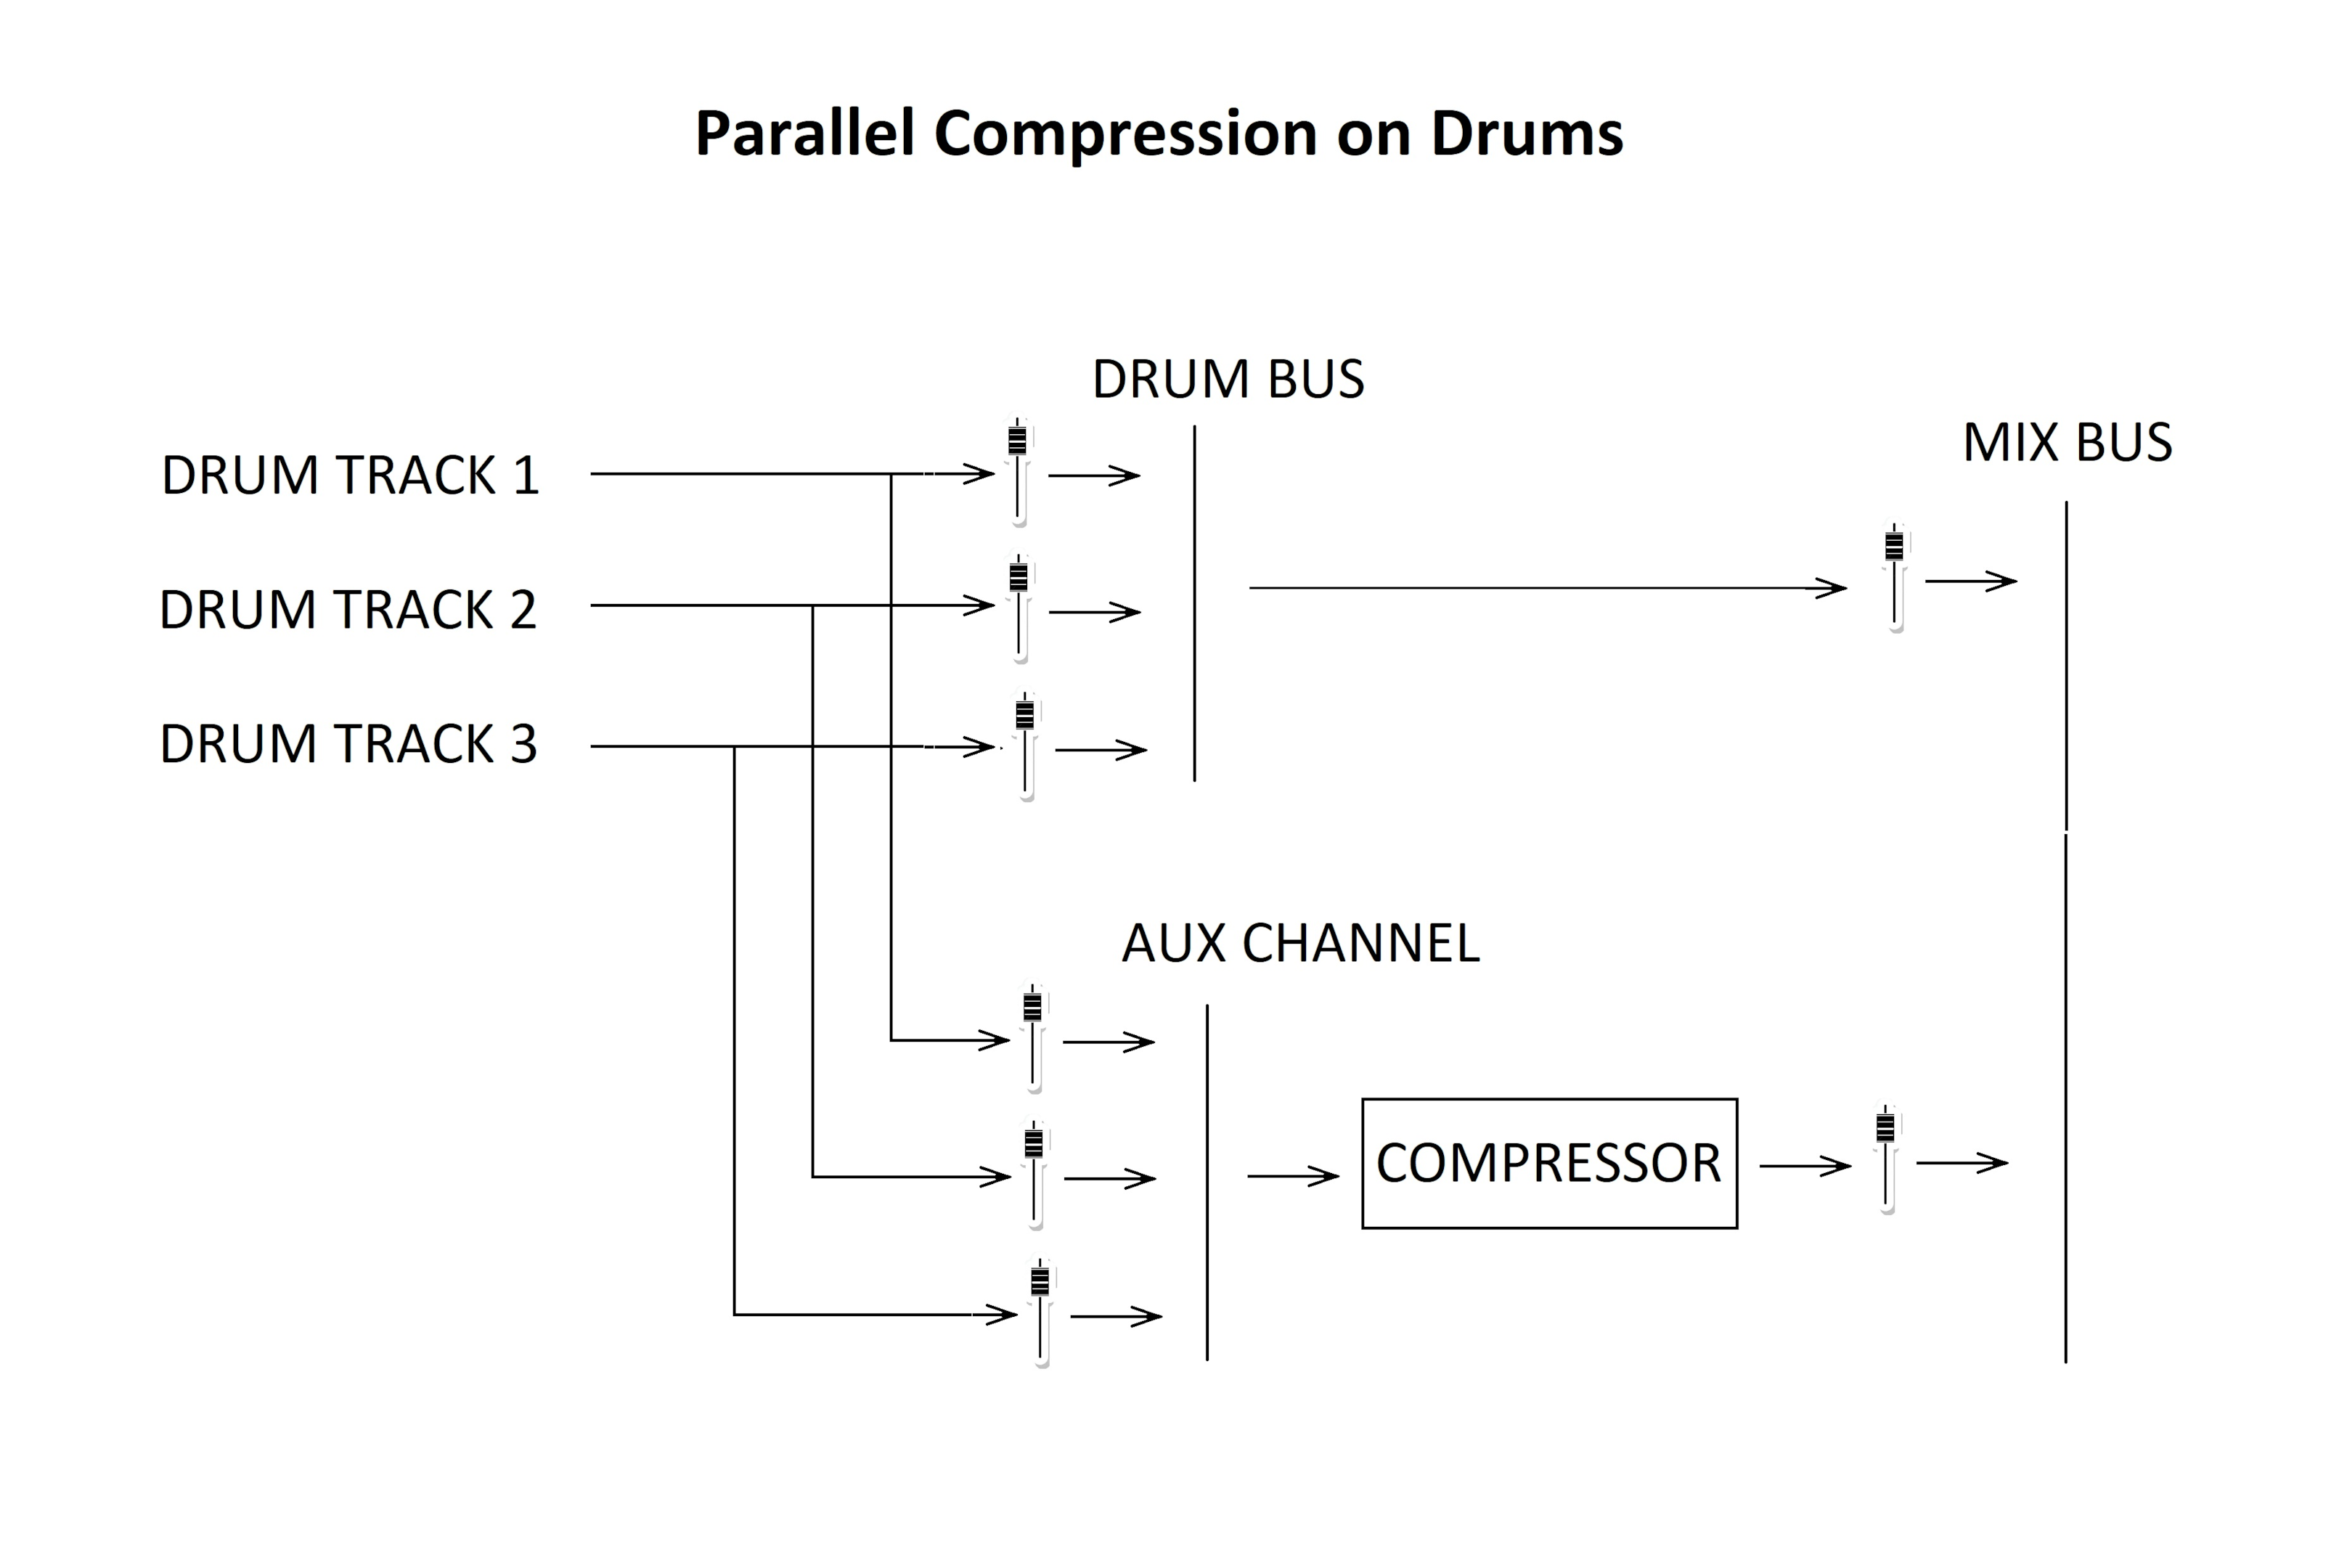
In this case, you create an aux track (also called a return channel or FX track) and send one or several tracks there. Add a compressor and EQ to this channel. This is the send method.
Remember, that all the sends you have to do pre-fader to have separate control over the amount of effect or processed sound that you add to the mix, and over the amount of the dry sound. This way, adjusting the effect volume you’ll not have to harm the overall balance.
If you parallel compress more than one drum sound, it’s better to send to the aux channel tracks one by one, not as a drum bus. This way you’ll have control over the amount of each drum in the effect.
Also remember that the mixer inside the compressor should be on 0% dry signal.
Duplicating the tracks
The most trivial method of creating parallel processing is, of course, just duplicating the tracks. If you simply duplicate the tracks you wish to compress, for example, your kick drum, and apply a compressor and other processing like EQ to the copy, it will be your parallel channel.
Parallel compression inside a plugin
Many compressors have a mix knob or a dry and wet knob to regulate the amount of dry and wet sound.
For example, the “dry” and “gain” knobs in FabFilter Pro-C 2. Using this you can avoid creating a send channel.
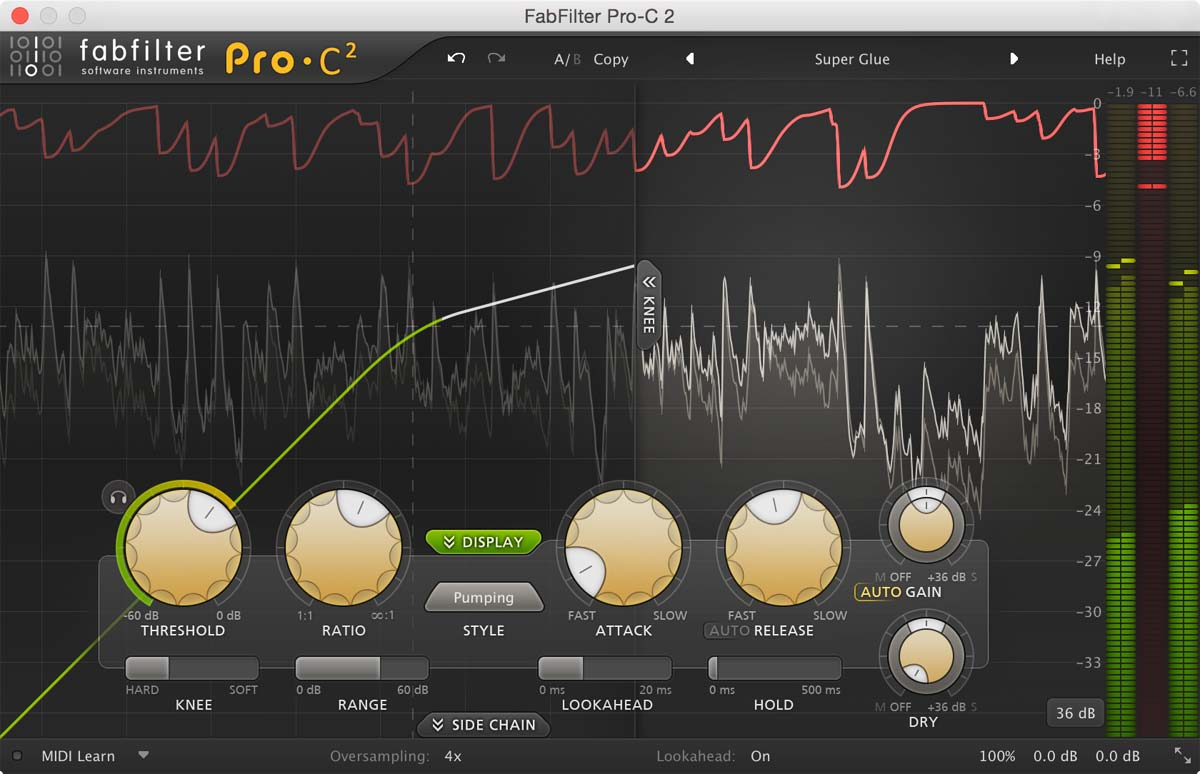
In this case, you’ll just regulate the amount of compressed and initial signal inside the plugin.
Which method of creating parallel compression is the best?
Which method to use for parallel compression depends on your mixing goals. If you need just a quick touch of parallel compression and are not planning to apply other processing to the compressed part of the signal, you can mix them inside the plugin.
In this case, your session will not be overloaded with extra tracks. This method is the easiest and quickest.
However, with a separate channel for the wet signal, you have much more freedom. For example, you can use EQ before and/or after the compressor.
Also, the New-York style requires equalization of the compressed version, which you won’t be able to do if you use a wet/dry mixer inside the plugin.
What is the best setting for parallel compression?
For this type of processing, engineers often use very aggressive compression.
First of all, parallel compression settings usually include a fast attack. A short attack time will make sure the transients are completely included in the processing.
The release time can also be set as fast. However, a bit slower release time is also possible for a less aggressive effect.
Heavily compress the track: you can choose the ratio up to 20:1, which will make an extreme brick wall compression.
Aim for a large gain reduction, which, with this heavy compression, will be more than 10 dB.
Remember that you’ll be mixing it with the dry sound afterwards. Even though your compressor is aggressive, parallel compression will restore the dynamics.
Note that before processing, you may want to prepare the signal with equalization. You can use a high-pass filter before the compressor to clear the low end, because extremely low frequencies will sound terrible when heavily compressed.
Can parallel compression cause phase issues?
Theoretically, there is a danger of having phase issues when you apply this processing. In the case of phase problems, you’ll hear that the drums get damaged and comb filtering may appear.
These problems can happen because the same sound wave will appear in at least two of your tracks. One wave will go straight to the mix bus, but the other will go through a compressor that can cause a tiny amount of latency. And if two similar waves are routed to the same bus, but one of them has a little shift in time against the other, there can be a problem.
However, as you use in-the-box processing and most of the DAWS compensate for plugins’ latency automatically, you probably won’t face phase issues when parallel processing your drums.
New-York style of applying parallel compression
 New-York style of mixing will make your drums even more sharp, punchy, and fat. For this, you use parallel compression but also bring the low and high frequencies of the compressed signal up with equalizer.
To make New-York drums, create an aux channel (return channel) and send your drums to it.
In many cases, you’ll also benefit from sending your bass there.
Don’t forget to use pre-fader send.
After that, compress the aux audio track with a fast attack and a fast or medium release time. Use heavy compression with a ratio of up to 20:1. Gain reduction should be 10 dB or more. You’ll receive a brick-wall compressed track.
Then, with equalization, substantially boost the frequencies around 100 Hz and 10 kHz by 6 dB or even more, up to 10 dB.
Now you can mix your compressed signal with the dry signal. For this, bring the fader of the compressed track down to zero, then start slowly moving the fader up, and listen to how the drums sound. When your drums and rhythm get enough body, you have created your NYC drums.
Should you parallel compress drums?
In our studio, we prefer using parallel compression on drums. But the best of all, this compression works on live drum recordings. You can use it for kick drums or for all the drum sounds in your mix.
However, whether or not to use this type of processing on the drum kit depends on your style of mixing. You can apply different compression techniques and get the desired effect.
You love the original audio recording of your drums and want them to sound natural, but they also need to be loud and fat.
You may try a slower attack time and try to create a good, fat sound with good transients. But if you cannot get the desired effect with one compressor or sequence of compressors, you’ll have to try parallel processing.
What does parallel compression do to drums?
Parallel compression increases perceived loudness, which increases the LUFS and RMS of a song. It adds body to the drums, enhances tails, and the sustain. It also preserves the drum’s transients in their natural shape, which is crucial for the rhythm and groove of a song.
Why is this compression used on drums more than on any other instrument? This type of compression was created especially for drums because they, together with bass, have to be powerful enough to form the basis of a song, but at the same time, the natural loud transients of drums must stay intact.
Where to use parallel compression besides drums
Generally, this type of compression will help if the instrument has high and significant transients that you don’t want to lose and, at the same time, has a lot of low-volume material that you’d like to enhance.
While parallel compression works wonders for drums, and it’s ideal for drums, many engineers use it for different instruments and even for vocals.
Sometimes, you can see it used on the master bus as well.
You can apply it when you want natural-sounding compression, and at the same time, subtle compression or a series of compressors with mild compression settings don’t do the trick.
You know that extreme compression will kill the dynamic range, and you don’t want this. In this case, create aux tracks and apply parallel compression.
We’ll help you create perfect drums in your song
Are you tired of trying to reach this perfect sound you have in mind? Does it always seem that something is missing in your song? This is because song mixing and mastering is the job for professional audio engineers.
Major Mixing is a team of highly experienced audio engineers with more than ten years of working on top projects. We follow the newest industry trends and apply the mixing techniques that are used to make top-chart compositions today.
Only the sound that is of exceptional quality and captures listeners attention right away has a chance to gain popularity and climb up the billboard charts.
Your songs deserve professional mixing and mastering, and they should stand out among the competitors.
Contact us now and let us help, because we are interested in your success.


