We can’t imagine music production today without Auto-Tune. Although Auto-Tune, made by Antares Audio Technologies, is the most famous and professional software for doing pitch correction, there are also a handful of other popular apps you can use for tuning recordings, especially vocals.
In this article, we’ll tell you how to successfully auto-tune a vocal track using only Logic Pro X and its stock plugin.
Why do you need a pitch correction plug-in?
Pitch correction, both automatic and manual, is used for vocal performance editing in almost all genres, not only hip-hop, rap, EDM, and pop songs. Some songs are produced in such a way that you can hear the famous robotic voice in the audio file, called the T-Pain effect. While listening to other songs, you can’t hear autotune at all, but it’s probably there, done gently to retain all the qualities of natural human singing.
Auto-Tune has become an integral part of professional vocal mixing, so if you are producing songs, you’ll need to know how to tune vocals.
If you are using Logic Pro X and don’t have Antares Auto-Tune yet, no problem, you can use a combination of stock plug-ins and built-in features of Logic Pro X for both automatic and manual correction.
How to do pitch correction in Logic Pro X
There are two main tools that you will be using for tuning vocal tracks in Logic:
- First is the stock plug-in, which is called Pitch Correction. It will help you tune the vocal track automatically.
- And the second is a built-in feature called Flex Pitch. This allows for manual Melodyne-like editing.
Combining the functionality of these two, you’ll have a pretty good set of tools for tuning vocals and monophonic instruments. You’ll be able to achieve the T-Pain effect if necessary, or apply the correction more gently and let the sound remain natural.
So, keep reading, and you’ll learn how to tune vocals like a pro using only Logic Pro X.
Pitch Correction stock plug-in in Logic Pro X
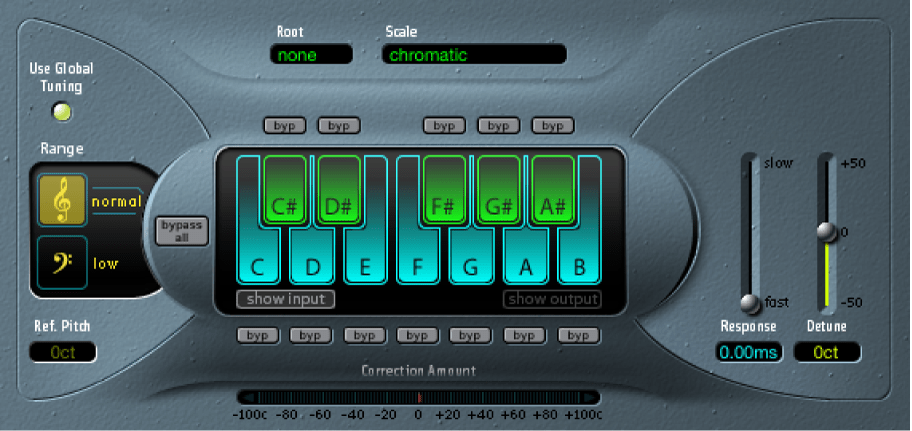
This plug-in is called Pitch Correction. You can find it among Logic Pro plug-ins in the Pitch group.
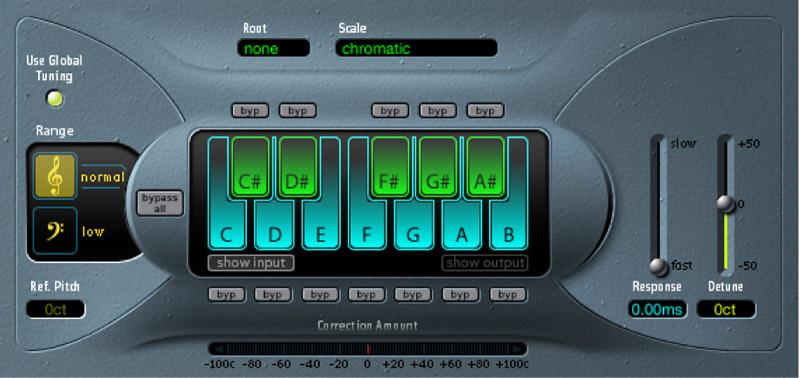
The functions are similar to those of the Antares Auto-Tune, but Pitch Correction is simpler. Let’s walk through the plugin’s settings and learn how it works.
Low or normal pitch range setting
If the vocal or instrument you are working with is in the middle or high-frequency range, set the Range to Normal. Only if the melody you are tuning plays mainly in the bass then set this parameter to Low.
Reference pitch or Global tuning
Global tuning means that all the instruments and vocals in the project are in tune with each other. It’s how it usually is, and in this case, engineers would keep global tuning on, and the reference pitch wouldn’t be changed.
However, in some cases, you might want to switch the global tuning off. This can happen when a vocal part or an instrument you are working with is tuned to a reference frequency that’s slightly different from your project’s global tuning. For example, the singer may sing all the notes a little flat compared to the standard. In this case, to correct the instrument or vocal generally, before auto-tuning is applied, you can determine the reference pitch parameter.
The reference pitch is set in cents (ct), which shows how many percent it’s sharp or flat compared to the tuning of the project.
The scale and the key
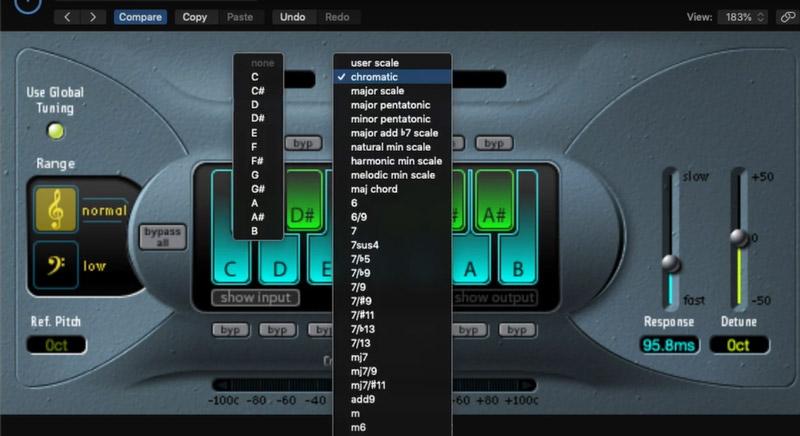 The plug-in allows you to choose the key of the song using drop-down menus. You can choose the major scale, the needed type of minor scale, pentatonic, or any other, there are plenty of options for musicians here.
If you know what key your song is recorded in, it’ll be easy to choose, and the notes that are absent from the scale will be automatically shadowed on the piano keyboard. The plug-in will not use these notes to tune the vocal pitch.
However, even if you have chosen one of the different pitch quantization grids and the root notes, you can still activate or deactivate the keys on the piano keyboard manually by clicking on them. In this case, the scale setting jumps back to the User Scale option as you are choosing the notes manually.
If you wish to choose the notes yourself in the first place, you can pick the User Scale option for the Scale and just select the needed keys on the piano keyboard.
Remember that it’s not necessary for the notes you select on the piano keyboard to form the complete scale of the song. Maybe you’d like to correct only one or two notes in the singer’s vocal performance, then you can bypass all the other notes (see the bypass option description below).
Also, you can choose just a few notes in the scale to produce some creative artificial auto-tune effects like vocal jumping back and forth between the notes that are far apart. In this case, you may select only a few keys on the keyboard and work with the tuning.
Bypass option
Similar to Antares AutoTune settings, here you can bypass a note by pressing “byp” near this note in the piano scale. This option is useful when there are certain notes in the vocal part you are editing that you’d like to leave untouched.
So if the program detects parts in the vocal close to this note, it won’t touch them. Without bypassing, the pitch would be corrected and brought exactly to this note.
Monitoring input or output
This parameter can be found below the piano keyboard. It gives you the option of choosing what notes will be shown on the keyboard when the track is played with the plugin.
Most of the time, the input signal and the output signal approximate the same key, and how this parameter is set makes no difference.
However, if the singer sings greatly out-of-tune or if you are changing the pitch a lot by tuning, the correction can surpass a semitone. In this case, the input and output notes may not be the same, so just pick what you would like to monitor: the initial pitch or the result.
Correction Amount bar
 Below the keyboard, there is a horizontal indication bar that will light up as you play and auto-tune your track. The length of the green bar will show the amount of correction in real time, it will be constantly changing.
The red part of the bar, if it is visible, indicates the tendency of the recording to be too flat or too sharp.
The response time
This is probably the most important setting in the Pitch Correction plugin. The response time determines how quickly the note is going to be corrected.
As you know, the Pitch Correction plugin, as well as Auto-Tune, brings the vocal at each point up or down to the nearest note in the scale.
If the response time is short, the notes are corrected quickly, and you can create different robotic effects. If it’s longer, the original transitions the singer makes between notes are preserved. The longer the response time, the more transitions are present, and the less we can hear the robotic effect of automatic correction.
On the other hand, if the response slider is set close to zero, automatic editing will result in the vocalist’s pitch jumping from note to note sharply without transitions, which gives us the noticeable effect of a robotic voice.
You’ll have to determine what response time to choose individually for every recording. It depends on different qualities of the singing, and you would have to move the response slider up and down, listening to the result you get, until you find the perfect response time setting for this particular vocal part.
Detune slider
The detune control is situated right next to the Response Time slider. It detunes the recording after the pitch correction is applied.
Most of the time, you will not use this option, letting it rest at the zero point. However, there can be times when you’d like to slightly detune the track you are working on.
One of the examples of when you may use the Detune option is when there are two or more vocals singing in unison in the song. So, you’ll be using this autotune plugin in Logic for several vocal tracks separately. As a result, they will be perfectly tuned with the computer’s preciseness. However, the ideal unison you receive may not be as interesting as it was before auto-tuning. A small amount of detuning in the tracks may be helpful to slightly increase the diversity and make the unison sound richer.
Checking the auto-tune Logic Pro X effect in real time
If you are recording a vocal part and are planning to apply a robotic auto-tune effect, it would be good to check how the vocal sounds with auto-tune right away. As you are planning to change the sound substantially, this real-time pitch correction monitoring is often necessary and helps you achieve the desired effect.
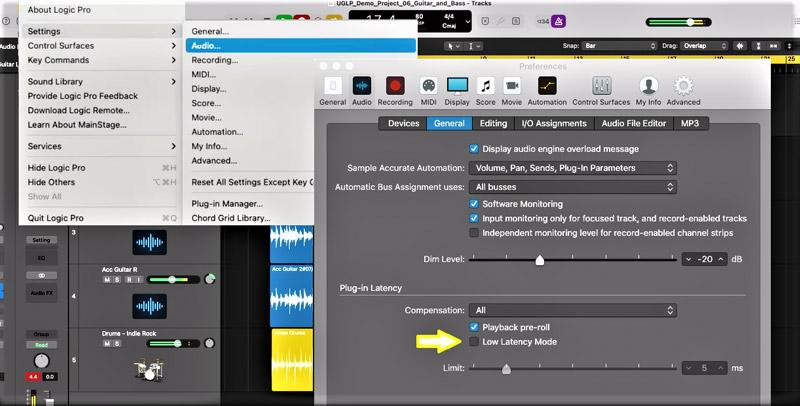
However, singing and listening to your voice at the same time with Pitch Correction may be difficult because of the latency. You or the artist you are recording will be singing and hearing the voice with a distinguishable delay.
Try to eliminate this issue by using Low Latency mode in the settings of Logic Pro X. It can be found in Settings → Audio → General settings → Low Latency Mode.
Be careful though, when the low latency is on, Logic may automatically turn off some plug-ins that would slow down the processing, such as some types of reverb and other effects.
 Automatic correction is easy, and you can receive various results from using it. You may be just tuning the vocal or instrument for perfect pitch or producing autotuned sounds with various creative effects. However, this autotune Plugin in Logic Pro is missing several functions compared to Auto-Tune from Antares, particularly the graphic mode, where you can edit every note manually in a Melodyne-like way.
This disadvantage is compensated by another Logic Pro feature called Flex Pitch.
Although this article is about automatically tuning monophonic tracks, manual correction is always a good addition, and you may want to use it to correct some particular notes or edit small parts of the recording. Let’s talk about Flex Pitch, where it can be found in Logic Pro X, and how to use its main functions.
Want a free test mix of your track?
We get it.
That’s why we’ll do a full hybrid (analog + digital) mix of your song —
for free.
No upfront payment. No risk.
You only pay if you’re blown away. And if you are, we’ll slash 40% off the final price.
Nobody else in mixing and mastering offers this.
Why?
Because most studios say yes to every project. We don’t. We only mix what we’re excited about — so send us your best track. If we like it, we’ll mix it like it’s going to the Grammys.
👉 Just drop your name and email to get started.
Flex Pitch – manual pitch correction in Logic Pro X
 When you use Flex mode in Logic Pro, you are able to manually edit every note’s pitch, vibrato, volume, timing, shape, and other characteristics.
How can I access Flex Pitch? You can activate Flex Mode by clicking the Flex icon in the project window.
Then use the Flex icon and Flex parameters in the individual tracks’ menus, choosing Flex → Flex Pitch for the track you are planning to edit in the track’s Flex pop-up menu.
When you enter the Flex Pitch mode for an individual track, the sound wave will be shown in the form of rectangles that represent notes, similar to MIDI notes, with a piano keyboard on the left.
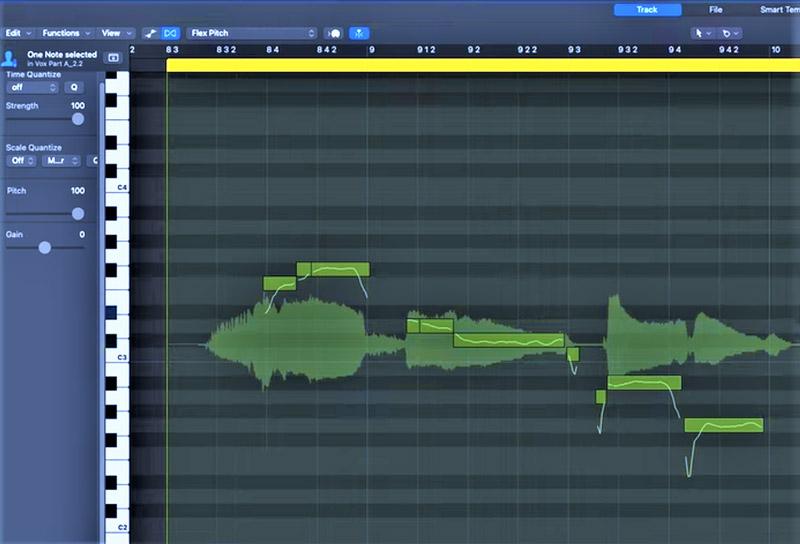 Bars that represent notes will be automatically assigned to parts of the recording. You can edit how Logic divides your track into notes using the Split and Join functions.
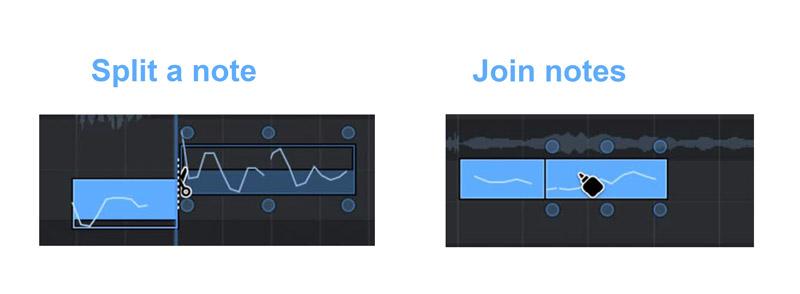 You can select a rectangle by clicking on it, then it becomes active and the six control points, called hotspots, are displayed around it.
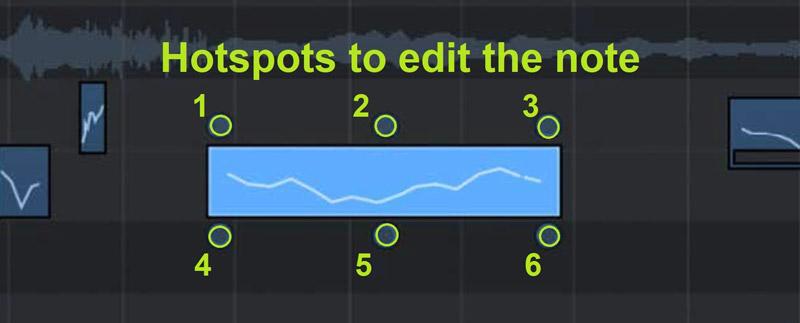 By dragging these hotspots with a mouse, you can change the following parameters of the note sound:
- The first spot affects the transition to the note (pitch drift)
- Spot number 2 changes the vibrato
- The transition at the end of the note can be changed using spot 3
- Spot 4 changes the gain if you move the spot up and down
- Spot 5, if dragged up and down, helps you to fine-tune the note
- Using spot 6, you can adjust the formant shift of the note
It’s worth mentioning that there is more than one way to work with sound parameters in the Flex mode. For example, you can use the Volume tool or Vibrato tool instead of the hotspots to edit volume and vibrato. Also, there is a gain correction slider and pitch correction slider in the flex mode shown for the track, you can select a note and use the sliders.
You can also tune one or more notes automatically. Select one note or part of the track and use the Set to Perfect Pitch option in the shortcut menu.
In general, Flex is a diverse and powerful feature built into Logic Pro X, and it has more functions that we have not explained here. Of course, in Logic, you can change the pitch of instruments as well, and work with apple loops, but in this article, we are focusing mostly on editing vocal recordings.
As you see, pitch correction and editing in Logic Pro X are not only possible, but the functionality comes close to Auto-Tune Pro. So, in conclusion, let’s compare the two.
Auto tune Logic Pro X vs Antares Auto Tune Pro
Auto-Tune Pro remains a more professional tool for automatically tuning vocals, and top producers will most definitely use it for preparing vocal tracks for future hits. If you are working with vocals professionally, especially in hip-hop, rap, pop, EDM, and other genres where vocal parts get corrected a lot, you’ll benefit from purchasing the Antares product.
Also, Logic is made for Mac users, this may be considered a disadvantage by those who prefer Windows.
Antares product has more advantages, for example, it has greater control over how human or not-human your corrected vocal will sound. Just one example: Auto-Tune has a Flex Tune option that allows you to leave artistic vocalizations that travel too far from a note uncorrected. There are a number of features that are unique to the Antares product and make it a preferable choice for mixing chart-toppers.
However, if you don’t have Auto-Tune access right now, don’t worry, you have everything you need inside your Logic Pro X Pitch Correction autotune plugin and the Flex mode.
Have any difficulties with pitch correction or with auto-tune effect?
Music production is a wonderful journey, full of creative tasks and inspiration. At the same time, it requires an enormous amount of studying and practicing if you wish to produce top-chart hits yourself, the songs that many people will notice.
The first challenge that the music industry sets before artists and producers today is ensuring the highest quality at every step of song production. Without it, there’s no way a song can win the competition on streaming platforms and stand out among thousands of other songs.
Major Mixing can help you keep your music production at the industry level and match the highest quality standards. Our studio is popular because our audio engineers have worked in the industry for over a decade, mixing and mastering music at a top-chart level. We carefully study the tendencies and trends in music production every day. We use this knowledge to produce the most modern and captivating quality of sound and help our customers succeed in the music industry.
So if you are not sure about the level of your mixing and mastering, don’t ruin your work by releasing a demo-level mix. Contact us today, we are here to help you grow your career.

